
OBJECTIVE // At Design Concepts - SF, we have two floors: the first floor is the workshop and front door where the packages are delivered to and the second floor is where the desks and computers are, and where all the people awaiting packages work.
There is a tendency for whomever answers the door to sign for the package and then place it on the shipping table downstairs but not tell the recipient it is there. This is completely reasonable behavior since the person who signs for the package is presumably busy with their own work, but typically when I am waiting on a package it is a time sensitive item and I could really use it as soon as it arrives.
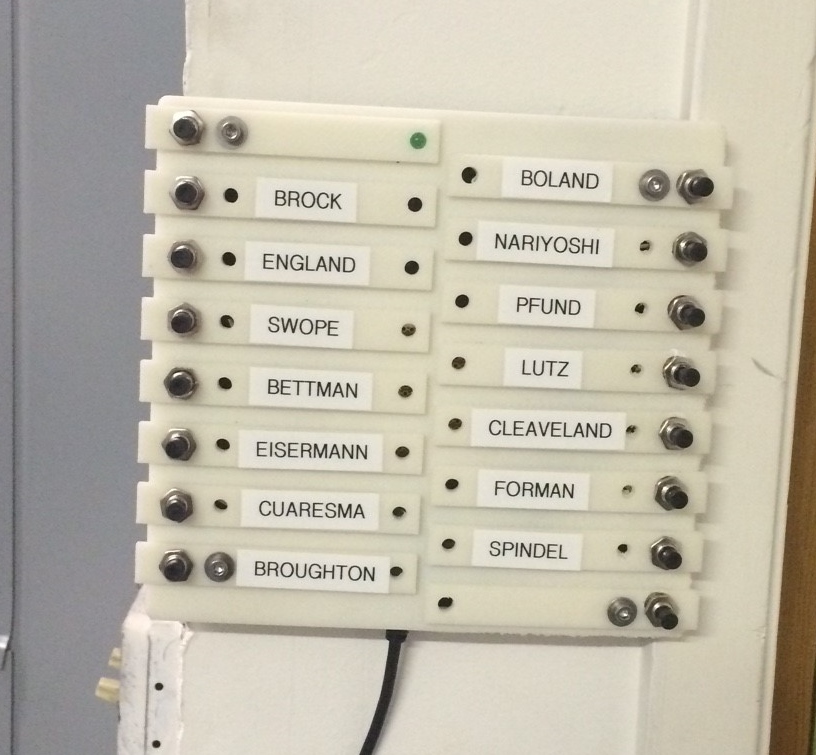
My proposal for this problem was to design an interface that would sit next to the package table that would let you select a button that corresponded to each possibly recipient and would allow whomever answered the door to notify each recipient via email that they had a package available downstairs.
INGREDIENTS //
……………(1) Particle Photon board
……………(2) Push button (16x) - Sparkfun
……………(3) FDM
……………(4) Various Resistors
……………(5) Outward facing web server
TECHNICAL //
The first build consisted of two main components: the PHP script running on my company's server that handled the email sending and a microcontroller that detected button pushes and requested an email be sent to the recipient.
When the PHP script was called, it was passed an employee's name, which was then processed and either connected with a specific email address, or determined to be an invalid employee name. Once identified as valid, a uniform email was created using Google's SMTP server and a "260ShipleyDelivery" email address. The capabilities of the email crafted are currently underutilized and only send a single line informing the recipient that the package is available, but the hope is to possible capture a picture of the package and include this in the email so the recipient knows which package has arrived.
The hardware was a bit more of a battle. The biggest technical challenge in the project was determining a way to make 16 different button pushes uniquely identifiable by the microcontroller. I wanted to use the Photon board because it had a wifi chip embedded in it, but this meant I had very limited IO pins, certainly not enough to account for all the button I wanted. After some brainstorming, I realized I could use a single analog pin with a different resistor in line with each push button which would produce a different resistance and subsequent analog reading on my input pin.

This system seemed to work fairly effectively. After a bit of testing, I employed an averaging filter to help improve consistency in the readings. The setup continues to have some bugs, but after a conversation with one of our electrical engineers, there are a couple improvements I think I need to make:
Increase the ground plane - adding extra wires to reduce inductance on the ground wire may help with noise
Better account for switch bounce - When a button is pushed, there is a short portion of time when the switch mechanically bounces and causes variations in the signal reading for about 15 ms. Since I am continually taking readings at a high sample rate, there is a possibility that I would same the pin value with in this window. To correct for this programmatically, I will check each reading to determine if a button is pressed (the value of no buttons pushed known), and if it has been, wait 50ms before sampling values and averaging. This will ensure that I am not using our skewed values.
Increase the window for each button's resistance value - With a resolution of 1/4096, there should be plenty of values to cover that I just need to vary the resistance values to ensure I have all the values evenly distributed across the spectrum.
User Feedback - The cost to for users to press the same button twice is low, as long as they know that they have to push it again. So I used an LED to tell the user that the email is being sent, which also provides them with the feedback that the button has or has not registered properly.
After I started seeing issues with the physical dashboard, I decided to code up a digital version too that we could run on a Windows tablet we had lying around the office. It was essentially a digital version of the initial dashboard except when the user pressed a button, it took a picture from the integrated webcam and saves the image with the name on the button and a time stamp. The hope was that I could use this to catch who was walking by and pushing buttons just to mess with me. (Though I got this running on my computer, I haven't been able to properly integrate the camera feature on the tablet version yet.)
LESSONS LEARNED //
Reading the signals on with the Analog pin was far more finicky than I thought. I didn't realize how much the mechanics of the button influenced the signal and the value that I was reading. There is a lot more for me to learn on the electrical engineering front, but this definitely helped me better understand what things I might need to consider in future projects.
You can't dictate what a user will find of value in your product. I thought that when I installed this device in the office, everyone would just start using it as it was intended. But the reality was that more than a handful of my coworkers found far more enjoyment to just mash buttons and send random emails, which made it difficult to conduct good beta testing.