
OBJECTIVE // To design and fabricate a hopper for the Kijani seed packing system. Entering into this quarter, the device consisted of an array of clamps on a board, but no way to funnel the soil into the clamps. The objective of this phase of the project is to design and fabricate a vacuum formed plastic hopper that will collect the soil from the farmer and distribute it to the array of clamps for filling.
BACKGROUND // The Kijani Forestry organization works with farmers in Northern Uganda to grow trees that can be used to harvest wood for charcoal in a more sustainable fashion while providing much needed cooking and heating resources for farmers. They partner with communities to corral volunteers to pack seed pots then after 6 weeks, the farmers return to retrieve the seedlings and plan them on their farm. After 3 years, the farmers have matured trees on their land ready for coppicing and wood harvest. Kijani helps turn this into charcoal and the profits are shared between the farmer and the organization.
We initially engaged with them through the Design for Extreme Affordability course at Stanford in an open ended way to understand how we might contribute to their work. As a consequence of the pandemic, our ability to conduct exploratory research in-country was hampered considerably. So leveraging the experience of the Kijani team leadership, we deciding to follow their suggestion of alleviating the bottle necks in the packing process. Without a doubt, the most time consuming part of the process was in the first handful of soil that was hand poured into the bag.
After a lot of brainstorming and prototyping, we landed on an idea for an array of clamps that would allow the farmer to quickly open a lot of bags and pack in soil. For more details on this design and the process to get there, please visit this page: https://bolandcommajack.com/kijani-clamp
Once I had completed the fine tuning the design and molding of the clamps, it was time to move onto the next component, which was the to build these clamps into an assembly for scaled manufacturing.
TOOLS //
……………(1) ShopBoat
……………(2) Formech 508FS Vacuum Forming Machine
……………(3) Solidworks & HSMWorks
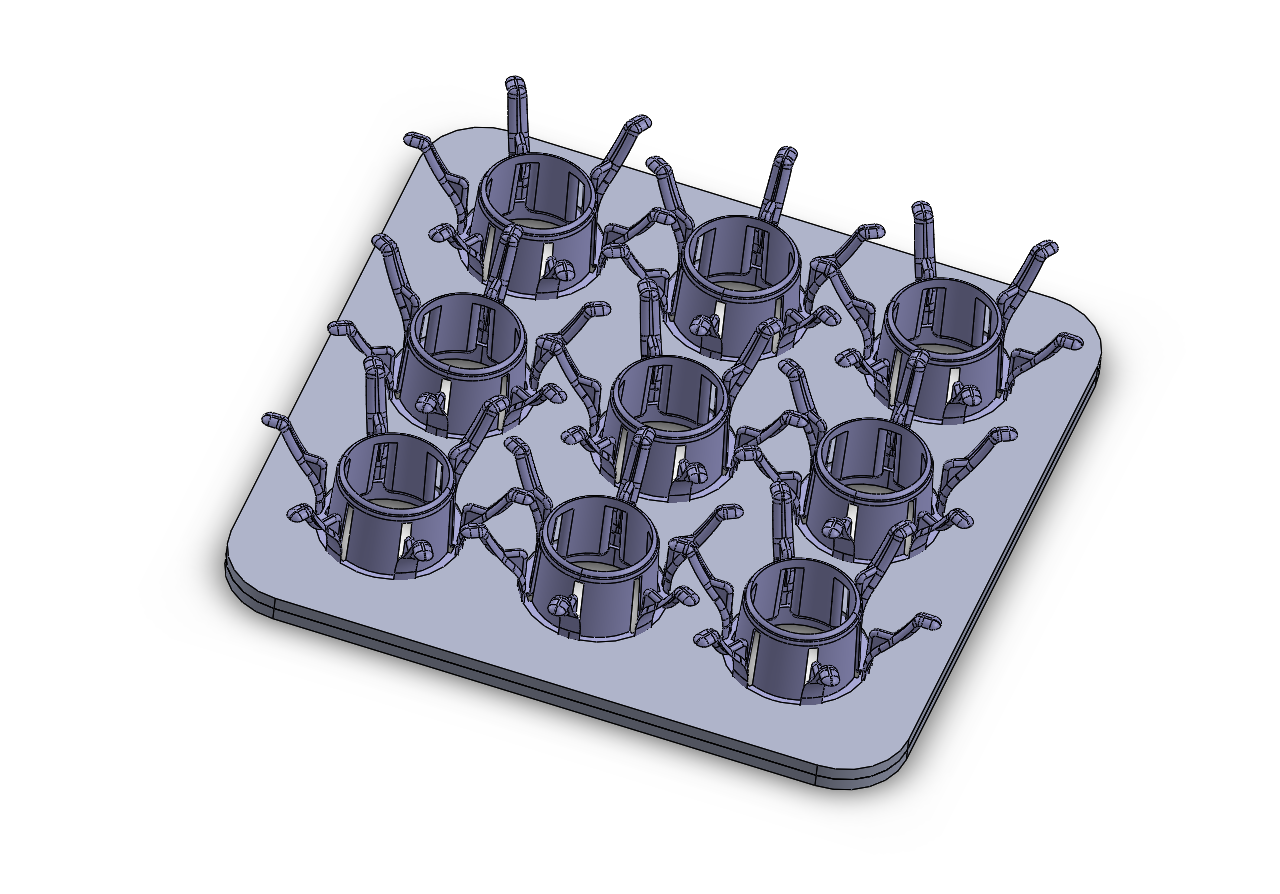
DESIGN // Part of my personal objective for this phase of the work was to use vacuum forming to act as the hopper for the soil as it was a relatively novel manufacturing process for me, which had additional benefit for me to explore. It is possible that bent sheet metal would be a more reasonable manufacturing process for these hoppers at the scale we are starting with in this context, but vacuum forming provided the opportunity for lighter weight components as they could be plastic instead of metal.
The Product Realization Lab has a Formech 508FS which allows for a max depth of draw of 11.5”, and a forming area of 19” x 17”. This was part of the determining factors that drove the size of the array, as well as efficiency of use of MDF sheets that I would use to make the buck and what I believed to be a reasonable amount of force resulting from the array of clamps. With these inputs, I designed a component that would not only act as a hopper to collect soil, but the same component could be used on the bottom side to act as a stand that would hold the bags at the right height when they are being compressed.

The design had cuts in each of the sides to make it easier to access the clamps when applying the bags; these also produced four feet when the assembly was flipped upside down. I used a fairly generous draft angle to ensure easy molding, which was also valuable to the process of funneling soil. Additionally, there was an indent in the bottom of the tray that would receive a 0.25” plate of wood that would help add rigidity to the assembly as well as provide the surface that would actuate the clamp arms. The intention was to mold the plastic sheet without the holes in them, then use a laser cut board with the correct size, and a flush cut router bit to cut the holes to the exact right size. I was hoping to experiment around with a couple different materials and material thicknesses as it was going to be a bit tricky to figure out exactly what would feel stiff and robust enough when the parts were molded.

MACHINING THE BUCK //
I chose to build the buck out of MDF and machine it using the 4’x4’ Shopbot located in the Product Realization Lab. In retrospect, it would have certainly been reasonable for me to craft this buck manually as it was not terribly complicated and it would have been much faster. But the use of the Shopbot was a personal objective of mine, so I wanted to attempt to use it to improve my CNC machining skills.
What I discovered when I got into machining the MDF was how much I was pushing the limits of the machine. In short, I needed a long endmill in order to reach the bottom corners because they were so deep, but the Z Axis couldn’t raise high enough to machine or traverse over the top with the long tool, so I had to strategically, and manually, swap in the short tool in order to do some portions. This, in combination with the plunge speed limit hardcoded into the Shopbot meant that my 2 hour machining job turned into 12+ hours of tedious problem solving and piece-meal machining. Additionally, because of the extreme depth of the part, I wasn’t able to use the installed dust collection skirt and instead had to use my own personal shopvac to remove the sawdust as it was being generated.


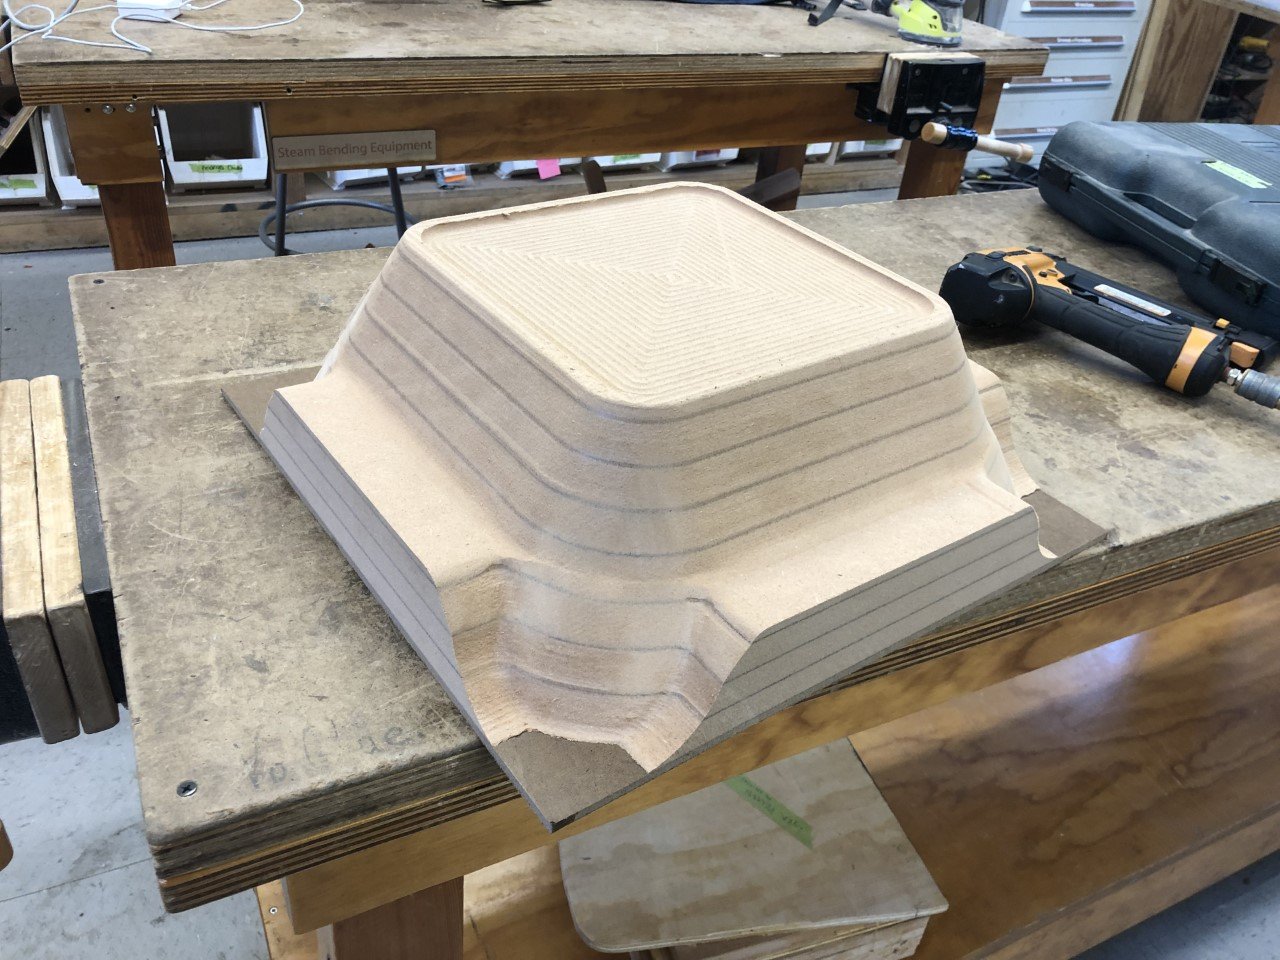
As a result of the piece-meal machining process, I ended up with a buck that didn’t match the original design perfectly, but was certainly sufficient to use to test out the vacuum forming and general dimensions. After some love from the palm sander and a little bit of patching, I was pretty happy with the state of the buck and ready for testing with the vacuum forming machine.
VACUUM FORMING //
The preliminary vacuum forming testing has left a fair amount to be desired. I ran 4 test runs on some 1/16” Makrolon polycarbonate and was not able to get any of them to soften appropriately, resulting in a plastic that was too hard and pulled itself out of the frame before I was even able to apply the vacuum. I was never able to get the plastic to ripple then sag appropriately, which may be a consequence


There are a couple things that I am considering as the source of the issues with this attempt at forming that I will research further and continue to flush out:
During the pre-stretch phase, the plastic was pulling out of the frame that was clamping it. I believe this is a result of a few things:
The plastic wasn’t heated enough so it was soft enough to stretch fully. I started with Formach’s guide, which said I should use a fraction of the heating that I seem to need, so I am curious if there is something different with the machine. Perhaps it needed to heat up a bit as the first one was definitely the coolest.
I wasn’t transferring it quick enough which meant it was cooling too much before coming in contact with the buck.
The amount of material in the frame wasn’t enough and it wasn’t getting clamped enough. I tried adding extra shims to increase the pressure put on the edges of the plastic to no avail.
From my research, the air bubbles seem to be a result of over heating. This was consistently happening on the back end of the heaters even though I had their values lowered. I am curious if this has to do with moisture in the PC. I noted that PC needs to be pre-dried before forming, so perhaps this was a sign that the moisture was causing bubbles.
The Makrolon may not have been the right material choice. It should be a suitable material for this application but perhaps I should try with a material with a slightly lower glass transition temperature first to get a sense of process then move to different plastics if needed. I was never able to get the plastic to settle down and smoothen after rippling.
NEXT STEPS // I plan to return to the forming process shortly once I have a chance to do a bit of research and talk with some people that have experience with this particular machine. Next, I intend to do the following to chase down the issues with the molding:
Discuss issues with Craig Milroy and Gabriella Macias to understand if there were parameters of the Formech that I had set incorrectly. Double check the functionality of all the heaters in the machine. Swap locations of heaters to see if there are some that are not functioning.
Purchase some sheets of styrene to test out and dial the settings for that material.
If my buck ends up being too large, I will slice sections out of the middle and reduce the size of the clamps.
Research more around the root cause of the bubbling and lack of proper heating.
Reference guide for the machine I was using: https://formech.com/wp-content/uploads/Manual-508DTFS_UK_070116_lowres.pdf